
This weekend, I have been busy migrating a customer from their on premise system (UNIX based mail Server) to Office 365. I have done this many times, but ran into some interesting issues due to the Domain registrar they are using (Plusnet).
The first thing I noticed was the fact that the MX records pointed to Plusnet’s own mail servers, which the on premise server connected to via POP3 to collect mail.
Gotcha #1 – Plusnet do not have any capability to add TXT or SRV records either (more on this later) via the console or through support. These leaves creating an MX record as the only way of being able to verify the domain to Office 365. This comes with a curve ball too – to add the necessary MX record, you have to change an option in the Plusnet control panel that effectively turns off the ability to collect mail via POP3 :

This clearly leaves you at risk of losing emails etc, so we have to verify the domain and set up the correct MX records for Office 365 in a timely fashion.
Gotcha #2 – Plusnet only appear to propagate DNS changes every 12 hours.. So I advise you do this over a weekend!
Ok, so lets add the record for domain verification:
![]()
![]()
leave the left field blank, and note the trailing dot on the end of the record.. Now wait. For a long time..
Whilst you wait, you may want to consider finding a new host for you domain name. Why? Plusnet do not allow you to add TXT records, essential for adding SPF, DMARC and DKIM records – without these, you are at risk of having your emails rejected by some domains, and may well end up on blacklists. Spammers could also easily use your domain for spoofing. If you are in any way concerned about your mail reputation, I would strongly suggest you find another registrar (I use Heartinternet, 1and1 and Names.co.uk – there are plenty of others)
Once you have verified your domain, you will need to add the real MX and CNAME records for Office, and wait again for DNS to propagate.
add the MX record as before, with the left field blank, and the right field should look like this yourdomain-com.mail.protection.outlook.com. set the priority etc as per the Microsoft suggested values.
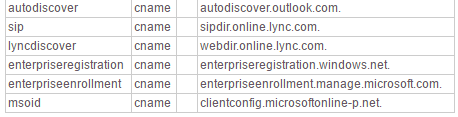
add the CNAME records as shown below, again, noting the trailing dot.
Congratulations! Once DNS has propagated, mail should now be flowing through the Office 365 mail servers, and you should be able to now use the migration wizard in the Exchange admin centre to migrate your emails across.
I use mxtoolbox and Whatsmydns for checking the status of DNS records.