

One of the best things about the Creality Ender 3 Pro is the ability to mod it and add to it, there are many upgrades that can be done to improve prints, quieten down the printer, and make it easier to use. I’m going to go through some of these in this post and hopefully give you some inspiration! Hopefully, you have already seen my post on adding a BLtouch – possibly one of the best upgrades I have done so far
Make it quieter
There is no getting away from it, these printers can be quite noisy. to help with this, you can install dampers on the motors which have quite a dramatic effect – I used these ones from Amazon

![]()
See how to fit them here:
Raspberry Pi Control
There is an excellent piece of software called OctoPrint used by many for controlling the Ender 3, and frees up your computer for other tasks, and also removes the need to keep transferring files to the microsd card. It is my preferred way of printing and has been 100% reliable. For this you will need:
- Raspberry Pi 3b+
- 16Gb Micro SD Card
- Optional* Power from the printer: Buck Converter and Splitter cable
- Optional* Touch Screen
- Optional* WebCam
- The OctoPi image
You will need some tools to be able to write the image to the SD card – I use Win32DiskImager for this. Write the image to the SD card but don’t remove it yet – we need to pre-configure the Wi-Fi settings.
Open the boot volume and using Notepad++ (don’t use regular notepad, or WordPad, it will corrupt the file) edit the octopi-network.txt
Find
## WPA/WPA2 secured
#iface wlan0-octopi inet manual
#    wpa-ssid "put SSID here"
#    wpa-psk "put password here"
Replace With
## WPA/WPA2 secured
iface wlan0-octopi inet manual
    wpa-ssid "put SSID here"
    wpa-psk "put password here"
Save the file and eject the card. Place it in the PI and boot the PI up.
Begin by going to your Raspberry Pi’s IP Address. In some cases, you can go to http://octopi.local to be able to load up the interface, but this does not always work. Follow the wizard through to set up the software. If you are using Cura as your Slicer (and I reccomend you do!) you can follow this excellent tutorial https://pimylifeup.com/raspberry-pi-octoprint/
If you want to power the Pi from the printer, I used this tutorial.
Filament guides
One thing you will notice is the angle the filament goes into the extruder at, this is quite sharp and can lead to wear – fortunately you can print the parts you need to fix this:


Raspberry Pi Case
This is the case I use personally to house my PI and the touch screen – there is an excellent guide here on setting up the touch screen

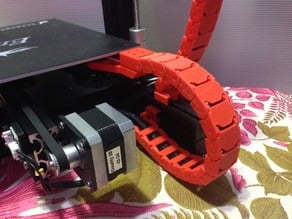
Cable Chain
Keep those cables neat and tidy, and stop them snagging..
Extruder Knob
Very useful for changing filament!

LCD Panel Case
Just to tidy up the exposed board

Tool Tray
Keep that work area tidy!

WebCam Mount

(I just glued this to my Raspberry Pi 3 Mount)
That’s it for this post, happy printing!